Using NVIDIA GPU’s with K3’s
Now you can attach to GPU’s from your containers in Kubernetes to run your machine learning or transcoding workloads.
I wish I didn’t have to write an article about this. It would be nice if Nvidia would (fully) open source their drivers so they could be a first class citizen on linux and in Kubernetes. That is not the case at the moment however so here is the journey you will need to take to get Nvidia GPU’s working with Linux (I am specifically on Ubuntu 22.04).
Installing Drivers
The first step is of course to install the appropriate drivers. I am going to assume you’d like to patch the drivers. Patching the drivers removes the artificial 2 transcode limit currently imposed on them. We will be building the drivers because why not.
Before we start this we need to ensure the nouveau driver is disabled. We are doing this because the Nvidia drivers are compatible with the K3’s modules we will be using later. If you would like expanded details on this step you can see this linuxconfig.org article where these instructions were pulled from.# Add Nouveau to the modprobe blacklist
sudo bash -c "echo blacklist nouveau > /etc/modprobe.d/blacklist-nvidia-nouveau.conf"# If the module is in the kernel, disable it
sudo bash -c "echo options nouveau modeset=0 >> /etc/modprobe.d/blacklist-nvidia-nouveau.conf"# Persist these settings on each boot
sudo update-initramfs -u
Now we can start building and applying the drivers. To make the process more straightforward lets install dkms. This will help with collecting the required dependencies for building the drivers.sudo apt install dkms
Next, we will need to download and install the appropriate drivers. For a nicely updated list that shows the drivers and which patches are supported check out keylase/nvidia-patch (which is where the code from below was pulled from).# Create a driver directory
sudo mkdir /opt/nvidia && cd /opt/nvidia# Download the files (this example uses driver 515.57)
sudo wget https://international.download.nvidia.com/XFree86/Linux-x86_64/515.57/NVIDIA-Linux-x86_64-515.57.run# Make the build script executable
sudo chmod +x ./NVIDIA-Linux-x86_64-515.57.run# Build the driver
sudo ./NVIDIA-Linux-x86_64-515.57.run
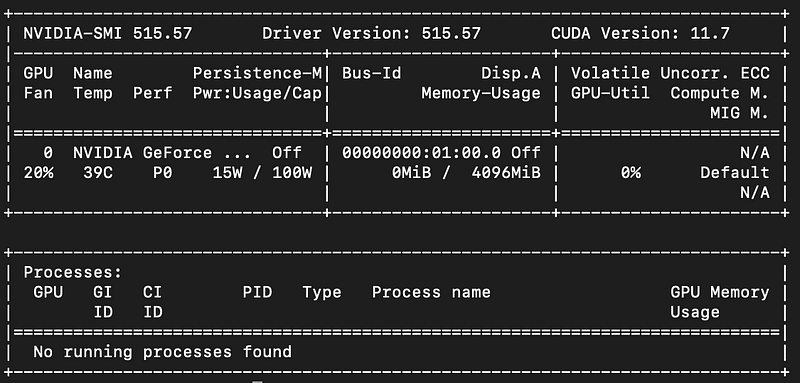
After the driver is installed we should be able to check it with nvidia-smi which should yield an output like the following one:
Patching Drivers
Now we can patch the drivers so that the transcode limit is unlocked. To do this you need to have Git on your server (sudo apt install git). If you run into issues with the following steps you should check out the source repo: keylase/nvidia-patch.# Optional if you want to start in your home directory
cd ~# Clone down the patch scripts
git clone https://github.com/keylase/nvidia-patch.git# Navigate into the repo folder with the patches
cd nvidia-patch# Ensure the patch is executable
sudo chmod +x patch.sh# Execute the patch (needs to be done in a bash shell)
sudo bash ./patch.sh
Installing Nvidia Container Runtime
Nvidia’s container runtime is now included in their tools project. To do this we have to add the signing key to our systems package manager (apt).
# Adding the signing key to apt
curl -s -L https://nvidia.github.io/nvidia-container-runtime/gpgkey | \
  sudo apt-key add -
# Create a variable with our distribution string
distribution=$(. /etc/os-release;echo $ID$VERSION_ID)# Install the appropriate package list for our distribution
curl -s -L https://nvidia.github.io/nvidia-container-runtime/$distribution/nvidia-container-runtime.list | \
sudo tee /etc/apt/sources.list.d/nvidia-container-runtime.listNow that it has been added to our apt sources list we can run the following commands to install it.sudo apt-get update \
&& sudo apt-get install -y nvidia-container-toolkit
After the install completes you have successfully installed the container runtime! We are almost at the finish line! Up to this point, we have installed our Nvidia drivers, installed our special container runtime that will allow us to use GPU’s with containers. Now we have to configure K3’s to use this container runtime with the containerd CRI (container runtime interface).
Configuring containerd to use Nvidia-Container-Runtime
Finally, the last step(s) to get our GPU’s working with Kubernetes. Here we are going to make some modifications to containerd the CRI so that it will use our new nvidia-contianer-runtime. To view the original documentation check out Nvidia’s guide here.
We will start by opening up /etc/containerd/config.toml in your text editor of choice (eg. vi, vim, nano). With it open we will make add the following block:
Additionally, if there is a long that contains `disabled_plugins = [“cri”]` we will need to comment that out by putting a # in front of it. Now we can restart the containerd service and it is off to the races!sudo systemctl restart containerd
With that you should now be able to schedule nodes to request GPU resources! Make sure to follow along for more guides and if you like this type of content check out my YouTube!