How to Get Your Firewall Rules to Stick on ESXi v7
A guide to creating custom firewall rules in ESXi vSphere 7 that persist past reboots.
Why do I have to write a post about this. I cannot tell you how frustrating it is to have a beautiful web interface that seems capable of doing anything yet here we are. Struggle no longer friend, here is how to create persistent firewall rules on your ESXi vSphere 7.0 host without vCenter.
Enabling SSH
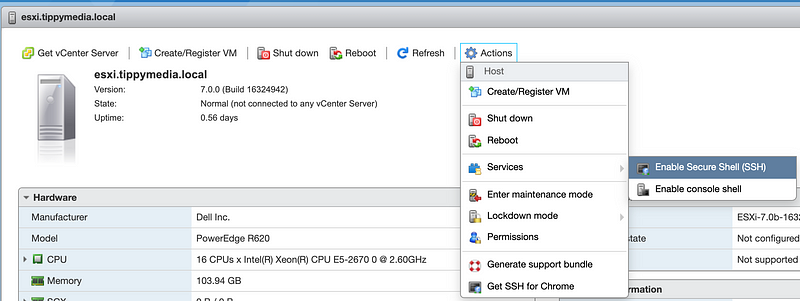
The first step is to enable SSH into your server. Navigate to your host in the browser. Then select host from the top left menu.

Next you will go to Actions →Services → Enable Secure Shell (SSH). Important note about this is you should keep SSH disabled unless you need to make changes like this.
SSH into the Host
Next you will need to SSH into your ESXi host. I won’t be covering how to do this but for windows you would typically use putty or WSL. For everyone else open a terminal and SSH in.ssh <username>@<host ip>
Setting Up the Firewall Rules
This is the really frustrating thing. Adding new firewall XML files to /etc/vmware/firewall will create the rules for you however these files will not persist on a reboot. That is why we have to create a shell script that creates these files every time we boot. To do so use the following command to open up the local.sh shell file:vi /etc/rc.local.d/local.sh
Small note this is the least beginner friendly text editor in the world so if you are new here is what you need to know. Pressing the ‘i’ key puts you into insert mode. This allows you to type in the document. When you are done typing you need to hit the ‘escape’ key. Now you are no longer in insert mode but you still are in the file. To exit the file you need to press ‘:’ and then ‘wq’ to write your changes and quit the file or ‘:q’ to quit without saving your changes.
Now lets discuss the contents of this file. Here I have configured 2 different sets of firewall rules (logging.xml on line 14 and k8s.xml on line 43). Each set needs to be setup as you see. The <id> tag denotes how it will show in the web interface. Each rule needs a unique rule id. These only need to be unique within the ConfigRoot tags though (see line 19 and 48 have the same rule id).
Next you need to specify direction inbound/oubound to/from esxi, protocol (tcp/udp), port type either destination or source (dst/src), and the port beginning/ending range. Finally you add line 72 to restart the firewall with the new rules.
It’s a little sad that we cannot just do this from the GUI but with these steps you can reliably have your network rules setup correctly on each boot. Don’t forget to ‘escape’ then ‘:wq’ after you have finished making edits to your file. Also, double check your work because making a mistake here would lock the host. If that happens you will need to pull out a monitor and connect in to see what is wrong.
Wrapping Up
Once you have finished these steps its time to reboot your host. Remember ESXi takes several minutes to boot up so be patient. I ran a ping against my host and walked away while it was rebooting. I think it took about 5 minutes to reboot. When I came back I was able to log back into the web interface and turn off ssh. Just like that though my firewall rules were up and running.
Checking to ensure was as simple as running the following command with the ports you opened:nmap -p <port> <ip>