Creating a Ghost site exposed with Cloudflare
Creating a self-hosted website doesn't have to be hard. We'll walk through how to deploy a GhostCMS site using Cloudfared as a reverse proxy with docker compose.

I've used quite a few different methods for publishing blogs over the years. I helped build the OpenSearch blog on Jekyll, I've published using a content platform like Medium, and I've written pages using C# and HTML. So far Ghost has been my favorite. It's allowed me to move away from the tedious work of building pipelines for rendering my static pages and focus on writing.
Ghost is a content management system (CMS). That means I can add all sorts of dynamic elements such as comments, logins, etc. all from within Ghost. Not to mention they support integrations with payment providers allowing me to monetize some or all of my content.
Another thing that had kept me from hosting my own site for so long was not wanting to mess around with with SSL certificates or opening up ports on my firewall. This is where Cloudflared comes in. It's let me move the tricky work of DNS, SSL, and fire-walling onto a platform built by the experts in these spaces.
Before we get started
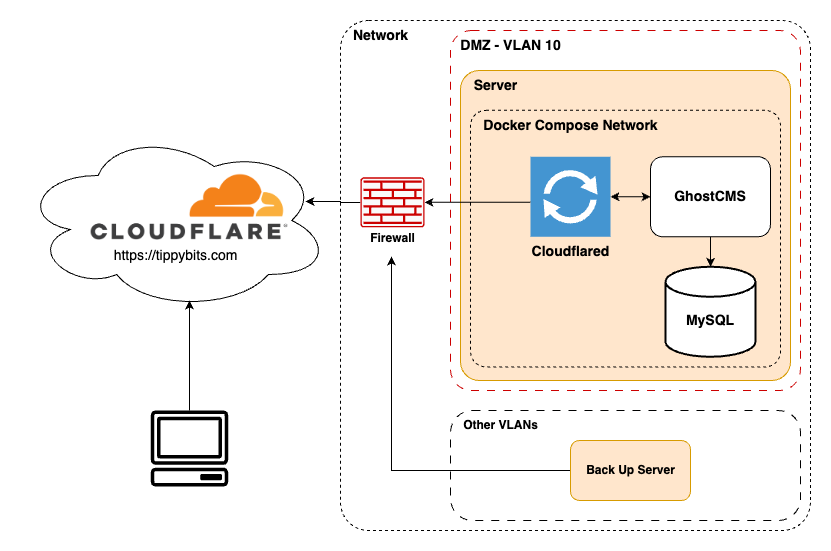
Above is a sample diagram of how I would deploy this in an internal network. Typically you will want to host externally accessible sites in a part of a network called a DMZ. In my example my DMZ is a VLAN separated from the rest of your network by a firewall that restricts it from accessing the other VLAN's. Since, Cloudflared is a reverse proxy it means we don't need to open ports on our networks firewall in order for outside users to get access to our site.
Server: You will need a server somewhere with internet access. I've seen people use a Raspberry Pi, EC2 instance, or an old laptop as a server for their site. You will want to set this server up with an operating system that specifically for the task. I'd recommend something like the most recent LTS version of Ubuntu Server if you are newer to Linux. This is the one that I will demonstrate today.
Once you have your server setup with Ubuntu you will want to install Docker Engine. Docker Engine does two things for us. Firstly it allows us to run containers which are a convenient way for us to run applications. Additionally, it comes with docker compose which is a utility that allows us to run several containers at once in an isolated network on our server. More on this later though.
Domain Name: This is how your users will access your site. Since we are using Cloudflare for our reverse proxy I'd recommend purchasing your domain through them. It makes setting up your site much more straightforward. I won't be covering this in depth here as there are plenty of guides on how to do this.
Configuring your site
To start I've created a sample repo (linked below) that can help get you going quickly with deploying your website. I'd recommend forking it to your own GitHub profile so you can modify it to fit your needs.
 dtaivpp
Once you have forked it and cloned it down to your server you will need to make the bootstrap file executable. This allows us to run the script.
cd ghost-starter
sudo chmod +x boostrap.sh
./boostrap.sh
After running this script you will notice a few files have been created:
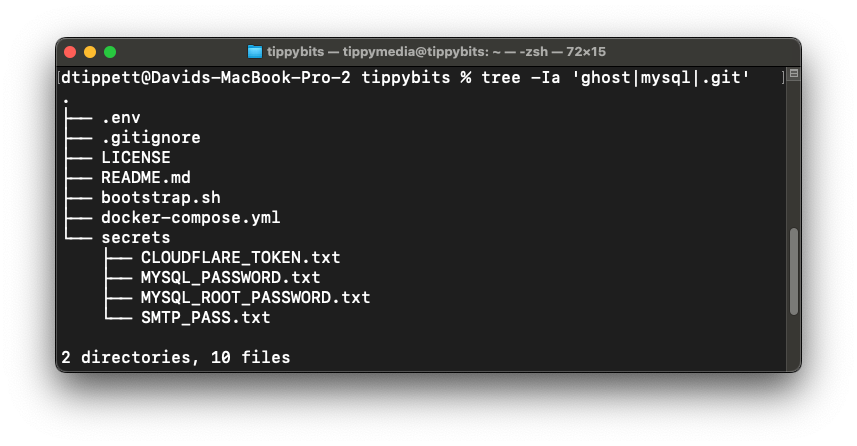
Inside the MySQL password and root password files you will find auto-generated passwords. You do not need to use these passwords however they tend to be harder to crack than manually created passwords.
Next, we will want to look at the .env file. It contains several configuration parameters we will want to set. The first will be the URL for your domain. This will effect where relative links go. When testing you will likely set this to something like http://localhost:2368 and for production you will want to set this to your domain name like: https://tippybits.com .
For our MySQL user this could be whatever you want to name your database user. Since I am just using this database for Ghost I will go with ghostdb here. Then the last setting I will talk about in this section is the DEPLOYMENT flag. This is how we will switch from a development Ghost instance to a production one.
# Change the domain to your website or localhost if testing.
URL=<https://yourdomain.com>

# Could be any user youd like
MYSQL_USER=ghostdb

# SMTP - Mail from is an address you have permissions to mail from. Below is just a demo.
# SMTP User - Username provided by your SMTP service
MAIL_FROM=noreply@<mail.yourdomain.com>
SMTP_USER=

# Set between production and development
DEPLOYMENT=development
Mailserver: This step is optional but if you'd like users to be able to login, comment, you will need to configure the SMTP settings. You can use Mailgun for this. I am not going to go through the whole process of how to setup Mailgun with your domain as they have guides that help with this when you create your account. What I will tell you is how to find your SMTP credentials once you've setup your domain to send and receive mail from Mailgun.
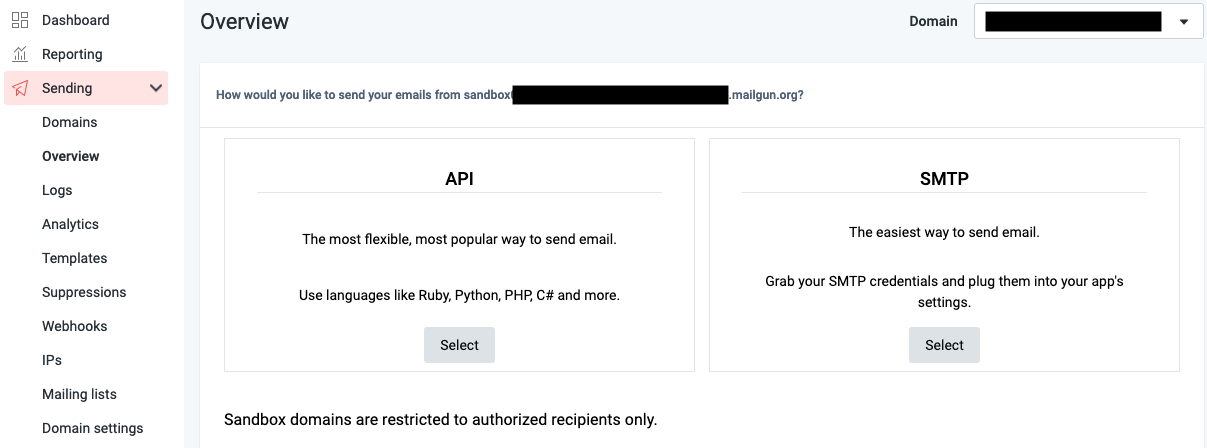
Go into your account and go to "Sending" on the left bar. Then select "Domains" and pick your domain from the list. Then you can go to the left bar again and select "Domain Settings" and you will see the below window. From here we will select SMTP and grab those settings and input the username into the .env file in the SMTP_USER field. This will probably be something like postmaster@<yourdomain.com>. The password will go into the /secrets/SMTP_PASS.txt file we created earlier.
Cloudflared: I debated if I should put this in the configuration section because it's bound to cause some confusion. Let me be clear here though, do not store your cloudflared token in your development environment. Only put the token on your production server. Otherwise your local development environment will become your production.
With that out of the way you will need to go to https://one.dash.cloudflare.com/ to login to your Cloudflare Access™ dashboard. Once you've logged in you will go to the left bar and select "Networks" -> "Tunnels". Then we will select "Create a tunnel" and "Cloudflared". Then you will name your tunnel. I kept it simple here and used sitename-ghostcms. Next you will get a screen where you can copy your tunnel deployment. I selected the docker option and copied it. Do not run this command. We are going to paste it onto a note pad or something and pull the token out.
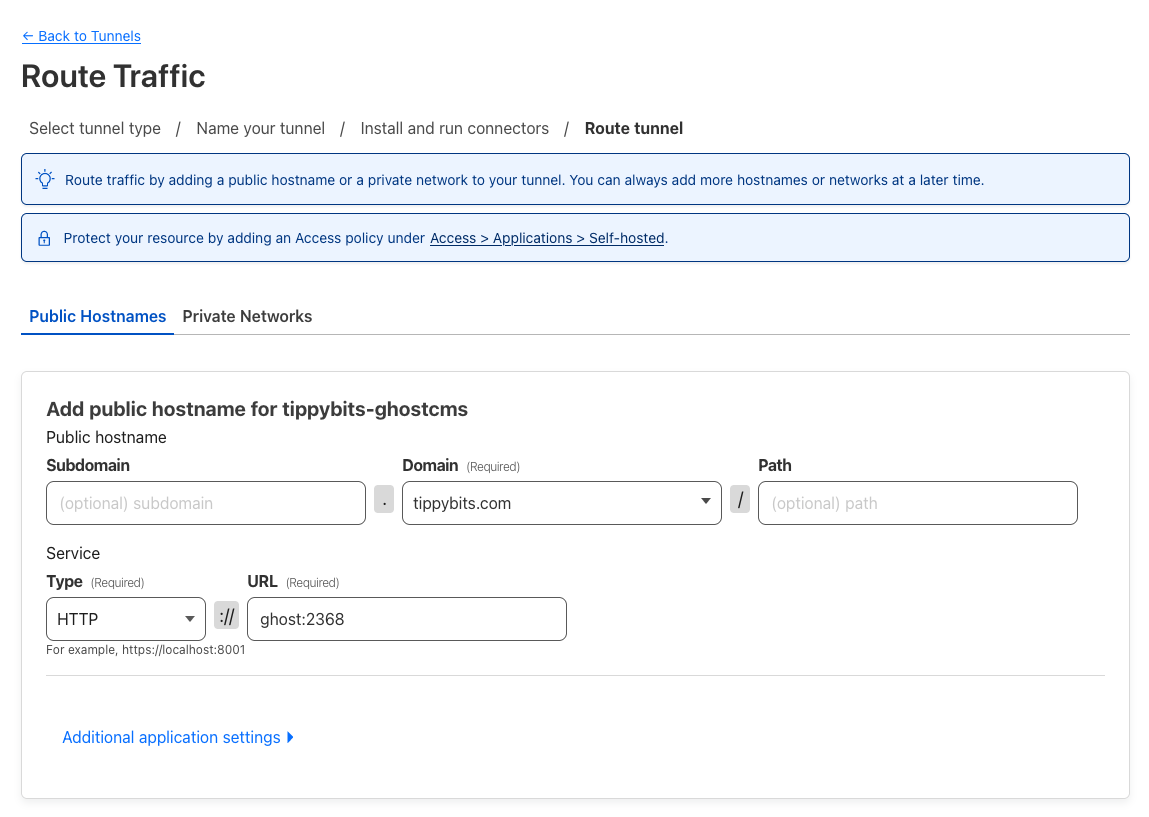
docker run cloudflare/cloudflared:latest tunnel --no-autoupdate run --token IjoiMTwtafwefawefweflktaelgrZTQ2NmJkYjA2YWY2YmE0OGIiLCJ0IjoiOTViNGU1OGQtNWQ1ZS00YmQ0LTg5ZGItYTdmYWI5NDQwfgw34tk1ERXdZamRsT0RrdFpEZzRNQzAwT1RjMkxUaGlOVaw4ffaw43amd5WW1RThe above is what it will look like (no that is not a real token but you can try if you want). We are going to copy everything after --token and paste it into our production servers /secrets/CLOUDFLARE_TOKEN.txt file. This is the magic that will connect our Cloudflared container to our account. Finally, we will connect the tunnel to our domain. Below is the settings you will want to use with your own domain name of course.
This configuration step takes all traffic going to your domain, such as tippybits.com, and routes it through a tunnel managed by Cloudflare that ends up on your server via your cloudflared container. This container next routes the request to `http://ghost:2368` which is the local hostname for your Ghost container. It took me forever to understand this. If you use this setup with your domain you should be good to go.
Deploying
Phew. I feel like 99% of the work here is configuring your environment 😮💨. Now we can do the fun part. LETS DEPLOY! To run your website execute the following command:
docker compose up -dThis will download and start up all of the containers with the configuration we have provided. There are a few things I want to point you to while this is starting up. We have not touched the docker-compose.yml file until this point but its worth looking at now.
Ghost does not seem to support accepting configuration via both config files and environment variables. I elected to add the config via environment variables. I couldn't seem to find anyone who had done the same. Any configuration option you find on the ghost documentation can be represented with an environment variable flag. Here's how:
mail: {
  from: [email protected]
  transport: SMTP
  options: {
    service: Mailgun
    host: smtp.mailgun.org
  }
}
Above we can see a sample config. We can turn this into environment variable config by separating each of the elements with a double underscore. This allows us to set any option that you see in the documentation. The above looks like this in our docker compose environment config.
services:
  ghost:
    image: ghost:latest
    restart: always
    ports:
      - "2368:2368"
    environment:
      mail__from: [email protected]
      mail__transport: SMTP
      mail__options__service: Mailgun
      mail__options__host: smtp.mailgun.org
Hope this helps someone who was as lost as I was when Ghost was overwriting your config files.
Claim your site! Finally, we can navigate to your site at the domain name you specified in Cloudflare. You will want to quickly go to https://yoursite.com/ghost to create your account and claim your site. And that's all! Now you can enjoy your time publishing blogs and building your own brand. If you've enjoyed this post and want to keep up with my content hit that little sign up button below! Cheers 😊